
Injection Instructions

Clean and inspect the injection site, Inspect the skin to make sure there is no irritation in the area. Alternate injection sites for sessions by shifting between sides of abdomen, Clean the skin with an alcohol swab and let the alcohol dry thoroughly.
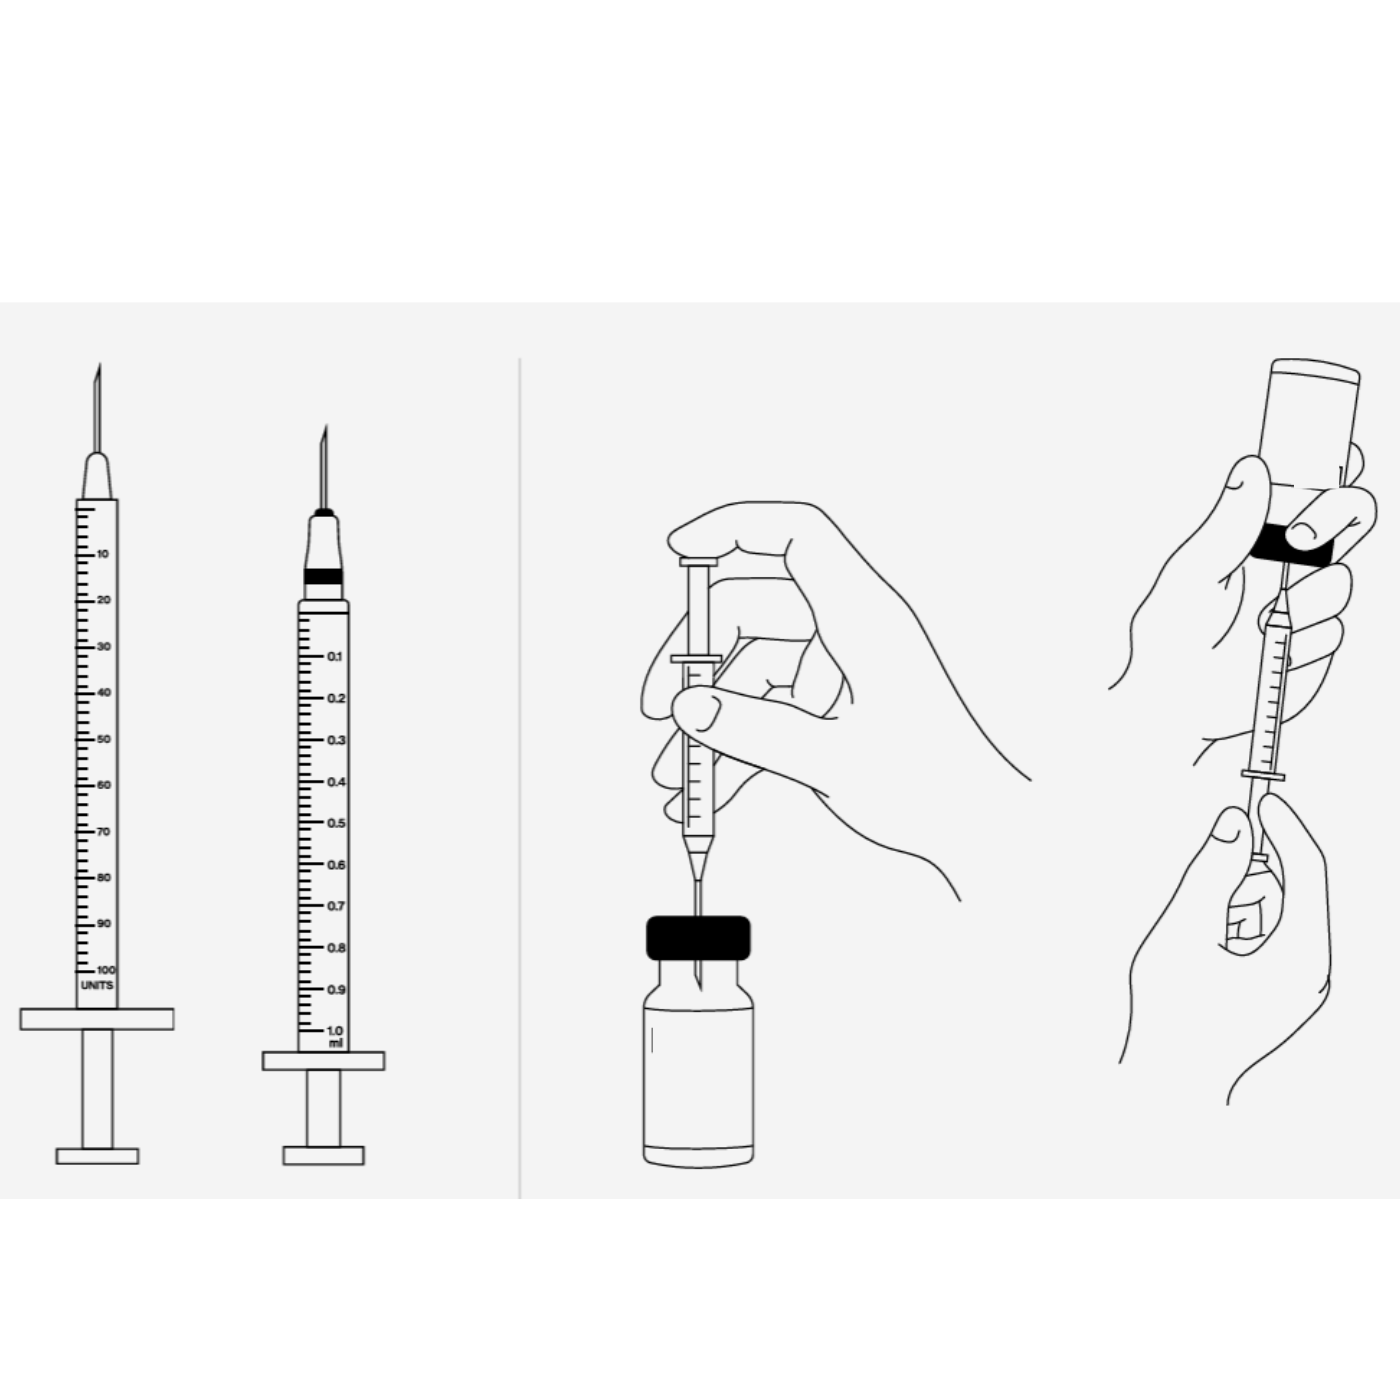
Prepare the syringe with medication. Before withdrawing medication double check you’re using the correct medication, at the correct dose. Remove the cap from the vial. Clean the tip of vial with an alcohol wipe. Draw air into the syringe. Draw back the plunger to fill the syringe with air up to the dose that you’ll be injecting. This is done because the vial is a vacuum, and you need to add an
equal amount of air to regulate the pressure, making it easier to draw the medication into the syringe.
Insert air into the vial and remove the cap from the needle and push the needle through the rubber stopper at the top of the vial carefully as to not bend the needle Inject all the air into the vial. Be careful to not touch the needle to keep it clean. Withdraw the medication. Turn the vial and syringe upside down so the needle points upward. Then pull back on the plunger to withdraw the correct amount of medication.

Choosing the optimal injection site
The efficacy of injections hinges on the careful selection of the injection site. Preferred locations for subcutaneous injections include the stomach, thigh, or the back of the upper arm. Each of these regions provides an ideal subcutaneous fat layer, facilitating optimal absorption of the medication.
Stomach: The stomach is a commonly recommended injection site due to its large surface area and relatively easy accessibility. The subcutaneous fat layer in this region allows for efficient absorption. When injecting in the stomach pick a spot approximately two inches from the belly button.
Thigh: The thigh is another popular choice as it also has a sufficient fat layer, making it suitable for subcutaneous injections. Choose an area on the front of the thigh and avoid the inner thigh.
Upper arm: The back of the upper arm is another option, particularly for individuals who prefer injecting in a less visible area. For upper arm injections, choose an injection site between the shoulder and elbow.
Proper injection technique
- Prepare the injection – gather the necessary supplies, wash hands, check the medication for any abnormalities. The liquid in the vial should be clear and colorless. Do not use it if it is cloudy, discolored, or has particles in it.
- Select the injection site in either the stomach, thigh, or upper arm.
- Clean the area – use an alcohol swap to clean the chosen injection site.
- Injecting the medication – hold the syringe at a 90-degree angle to the skin, insert a new needle swiftly and steadily, inject the medication and hold for a few seconds before you remove the needle.
- Dispose of supplies – safely dispose of the used needle and any other materials. Throw away used needles in a hard, closed container that the needles cannot poke through. Keep this container away from children and pets.
How often should you rotate injection sites?
The frequency of rotating injection sites can depend on the recommendations provided by your healthcare professional or prescribing information for the medication. However, as a general guideline, it is advised to use a different body area each time you give yourself a shot.
For example, if you are administering once a week, you might rotate between the stomach, thigh, and upper arm. This rotation helps prevent irritation, discomfort, or changes in the skin at the injection site.
Keep track of where you give each injection to make sure you rotate body areas.
Listen to your doctor
Incorporating injections into your weight-loss strategy requires meticulous attention to injection sites and technique. Always adhere to the guidance provided by your healthcare professional. If you have any concerns or questions regarding administration seek professional advice.
Injections aid in weight management. You should use them alongside a nutrition and lifestyle program such as the program is designed for individuals who are taking weight-loss medications and would like support in developing sustainable healthy habits for long-term weight management.
Reasons for Freezing Your Medication
Compounding medications are sometimes delivered frozen for several reasons:
1 Stability: Some medications are more stable and maintain their effectiveness better when kept at low temperatures. Freezing helps preserve the chemical integrity of these compounds until they are needed.
2 Storage: Certain compounded medications may begin to degrade or lose potency at room temperature or even when refrigerated. Freezing can halt this degradation process, ensuring that the medication remains effective for a longer period.
3 Extended Shelf Life: By keeping the medication frozen, the storage life can be significantly extended, which is crucial for both patients and healthcare providers to ensure that medicines are available when needed without loss of efficacy.
4 Reconstitution Requirements: Some medications are intended to be shipped or stored frozen and then thawed and reconstituted for use. This process ensures that the correct dosage and composition are maintained.
5 Infection Control: Freezing can also help minimize the risk of bacterial growth in certain medications that are particularly susceptible to contamination.
When you receive a frozen compounded medication, it’s important to follow the provided instructions for thawing and storing it properly to maintain its efficacy and safety. Make sure to let the medication thaw for atleast an hour prior to administration.